Fax User Guide
Business PBX lets you send and receive faxes without a fax machine. Incoming faxes arrive in your email inbox, and outgoing faxes are sent straight from a web interface by uploading a document.
Receiving Faxes
Faxes sent to your fax number are received by the system, converted to a PDF document, and emailed to a nominated email address. There's nothing to install or configure on your computer — each fax simply arrives as an email with the fax attached as a PDF.
This can be an individual's mailbox or a shared mailbox (for example, accounts@yourcompany.com.au) if several people need to see incoming faxes.
Setting the Email Address
You can set or change the email address that incoming faxes are sent to:
- Log in to the web interface using your email and password.
- Open your account profile by clicking your avatar in the top right corner.
- Choose Settings, then Notifications.
- Enter the email address you want incoming faxes sent to, and save your changes.
Tip
Add the sending address to your safe senders list so faxes don't end up in your junk or spam folder.
Sending Faxes
Faxes are sent from the same web interface. You upload a document, preview it, enter the destination fax number and send it.
Opening the Fax Screen
Log in to the web interface using your email and password, then click on Fax in the left hand side menu.
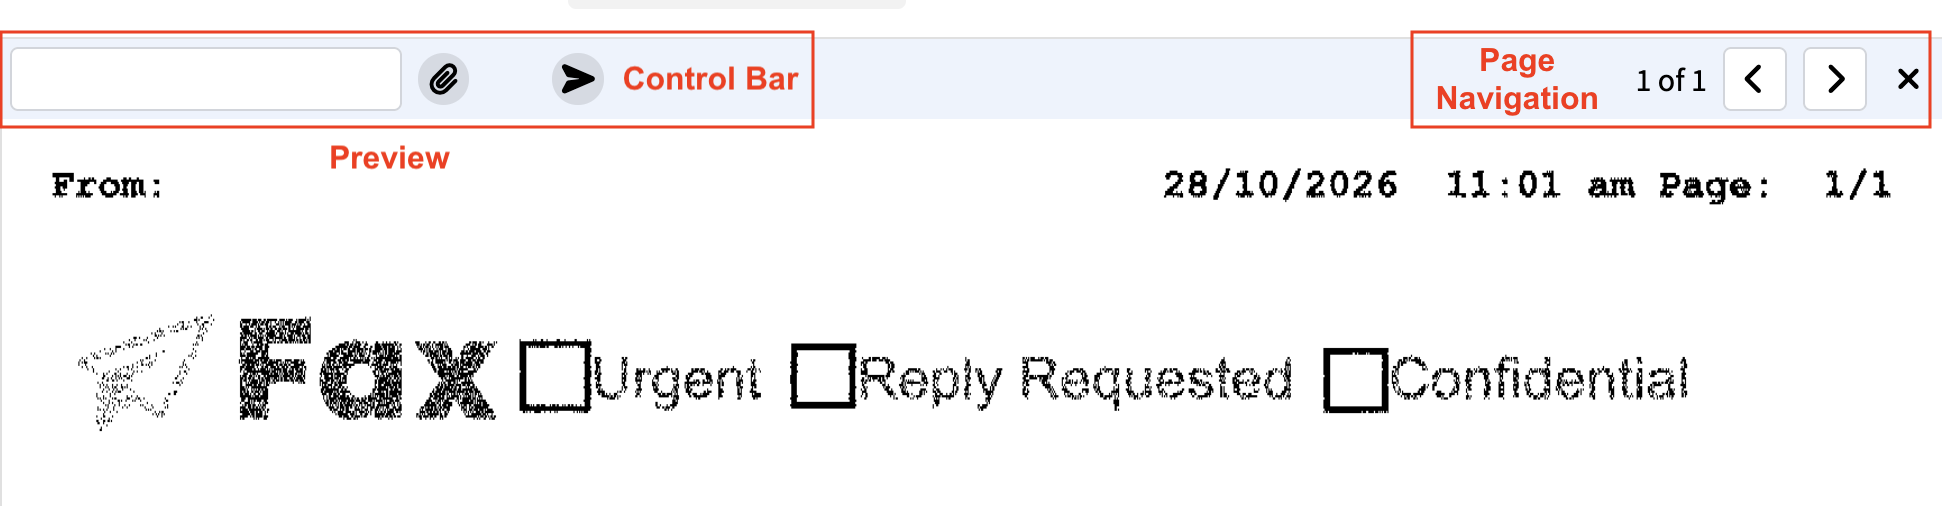
The fax screen has three parts as shown above:
- A control bar across the top, where you upload your document, enter the fax number and send.
- A preview area, showing the document as it will be sent.
- Page navigation, for moving between pages of a multi-page document.
Sending a Fax
- Prepare your document. PDF is recommended — image files may not be fully supported.
- Upload the document by clicking the paper clip button in the control bar, or drag and drop the file onto the preview area.
- Check the preview. Use the page navigation to review each page, and confirm the header has been added to each one.
- Enter the destination fax number. For international numbers, include the country code.
- Click the Send button.
- Watch the progress bar and page counter as the fax is transmitted. To cancel a fax part-way through, click the Stop button.
Note
Once sent, you can check the status of the fax in your Call Logs.
Fax Headers
A header is added automatically to the top of every page you send. It shows:
- On the left: your fax number (caller ID).
- On the right: the date and time, and the page number (for example, Page 1 of 3).
You don't need to add a cover page or header to your document yourself.
Troubleshooting
If a fax won't upload or send, check the following:
- The document won't upload. Make sure the PDF isn't corrupted and that the file size is reasonable. Try re-saving or re-exporting the PDF and uploading it again.
- The fax fails to send. Check that the fax number is correct and complete, including the country code for international numbers. Confirm the receiving number is a fax line and not a voice line.
- The fax is hard to read at the other end. Use clear, high-contrast documents in a standard paper size (A4 or Letter). Avoid faint text, coloured backgrounds and small fonts.
- Incoming faxes aren't arriving. Check your junk or spam folder, then check the email address under Settings > Notifications in your account profile (see Setting the Email Address).
If the problem continues, please contact us.